Google Tag Manager Custom JavaScript Variable Guide
TrackingbyGTM – Digital Marketing | Web analytics | Social Advertising Expert
Google Analytics 4 Tutorial for Beginners
Tracking by GTM
November 25, 2024
Google analytics 4
Google Analytics 4 (GA4) is a web and app analytics platform that provides a deeper understanding of customer usage. It’s the next generation of Google Analytics, replacing Universal Analytics (UA). GA4 is important because it
Improves customer understanding
- GA4 tracks the customer journey across platforms, providing insights into how users interact with your website and app.
Provides privacy controls
- GA4 includes privacy controls like cookieless measurement, behavioral and key event modeling, and privacy-first tracking.
What are you going to learn in this blog post?
I have split the article into four main chunks:
- How to properly install Google Analytics 4
- How to track events with Google Analytics 4 (and where to find that data in the interface)
- How to track key events with Google Analytics 4 (and where to find that data in the interface)
- Resources on how to build reports with Google Analytics 4
We have lots of things to cover, so if you don’t have enough time now, you can bookmark this Google Analytics 4 tutorial and come back later.
Want to learn much more about Google Analytics 4?
GA4 is a complex tool with many things to learn/master. And even if you know how to configure certain things, how can you get insights and value?
That’s what I will teach you in my Google Analytics 4 course. I will show you how to configure everything properly, collect data, build reports, and, most importantly, get value out of your data.
If you want to learn more, take a look here.
Deploy cookie banners on multiple client websites with our agency platform. The power of compliance and transparency for your clients’ websites. With our agency platform, effortlessly deploy cookie banners across multiple websites, ensuring adherence to privacy regulations while fostering trust and transparency with users.
- TrackingbyGTM
Chapter I: Install Google Analytics 4 with Google Tag Manager
In this chapter, we’ll look at one of the basic (but fundamental) topics – how to install Google Analytics 4. We’ll do that with Google Tag Manager (using GTAG instead? Then watch this). Here’s the process of how to install Google Analytics 4 with Google Tag Manager:
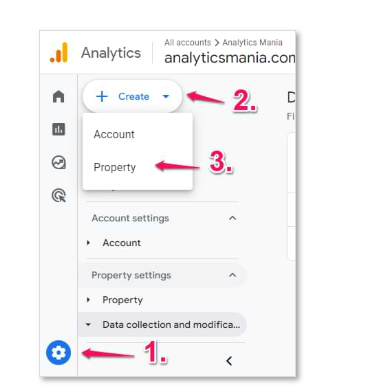
- Create a new GA4 property
- Create a data stream
- Copy the Measurement ID
- Create a Google Tag
- Paste the Measurement ID and set the tag to fire on the Initialization event
- Preview/test the new tag
- Publish the changes in Google Tag Manager
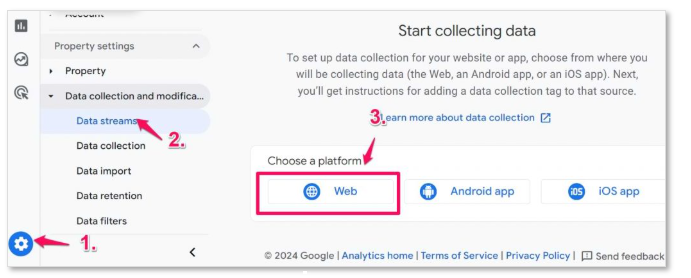
#1.1. Create a Google Analytics 4 property & Data Stream
If you want to create a new Google Analytics 4 property (and you are not upgrading to GA4), then go to the Admin section of your Google Analytics interface (by clicking the Admin at the bottom-left corner) and then (in the Property section) click Create Property.
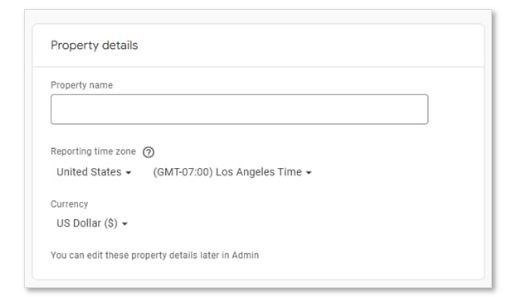
Then, enter the name of your property. It might be the name of your website, of your company, a brand, etc. Choose your company’s country, reporting time zone, and the main currency that your business operates in.
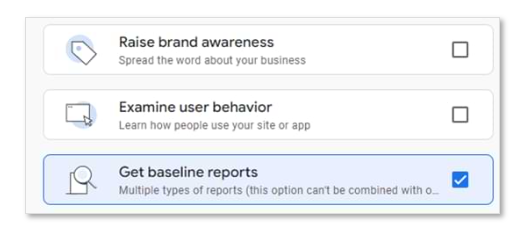
Then press Next, and answer several questions. Then you will need to select your business objectives. Based on these choices, the reports that you will have in the interface will change too. To make things simpler right now, select Get baseline reports.
Click Create.
The next step to complete is to configure your first data stream. It is a data source from which events will be sent to your Google Analytics 4 property. You can have multiple data sources in a single property. For example, three web properties, 1 for an Android app and 1 for an iOS app.
But in most cases where you track websites, it is enough to have just one web stream (even if you track several websites with it).
In this blog post, I will focus on a Web stream. Select it.
Then enter the URL of your website . Note that the protocol (https) is already selected. After that, enter the name of your website.
When you create a web data stream in Google Analytics 4, you can enable/disable Enhanced Measurement. It is designed to help marketers get as many events in the reports as possible without cooperating with developers or configuring them in Google Tag Manager.
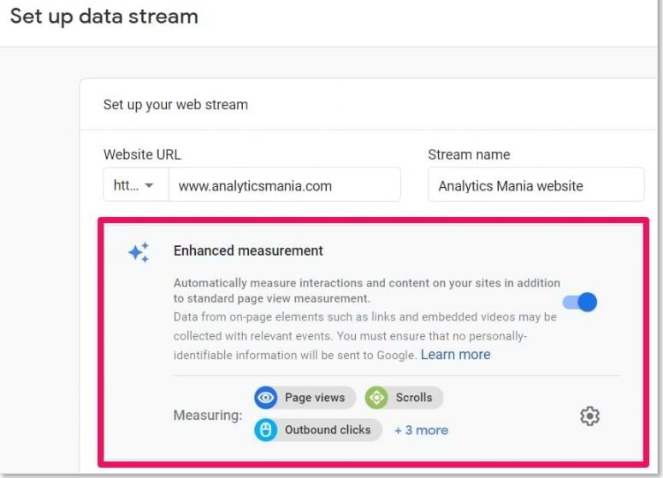
By default, this feature is enabled and will automatically track the following events:
- Page view (event name: page_view)
- Scroll (event name: scroll)
- Outbound link click (event name: click with the parameter outbound: true)
- Site search (event name: view_search_results)
- Video Engagement (events: video_start, video_progress, video_complete)
- File Download (event name: file_download)
- Form submissions (event name: form_start and form_submit)
If you want, you can disable/enable events individually. You can do that by clicking the gear icon in the Enhanced Measurement section and then clicking the toggle buttons.
If you will not Setup Cookie Concent You need to disable personalized Advertisng option in gyour Data streen oetherise GA4 will Stop Data Processing !
#1.2. Install Google Analytics 4 with Google Tag Manager
When you create a data stream (web), you will see a Measurement ID.
General Data Protection Regulation (GDPR):
Copy it. We’ll need to use it in Google Tag Manager.
By the way, if you ever get lost in the GA4 interface, and you need to revisit this page, go to Admin > Data Streams > choose your most recently created stream, and then you will return to the same window that I have displayed in the screenshot above.
Then go to your Google Tag Manager container (if you haven’t worked with it, here’s a tutorial on how to get started) > Tags > New > Google Analytics and choose Google Tag.
In the Tag ID field, enter the ID that you copied in the GA4 interface.
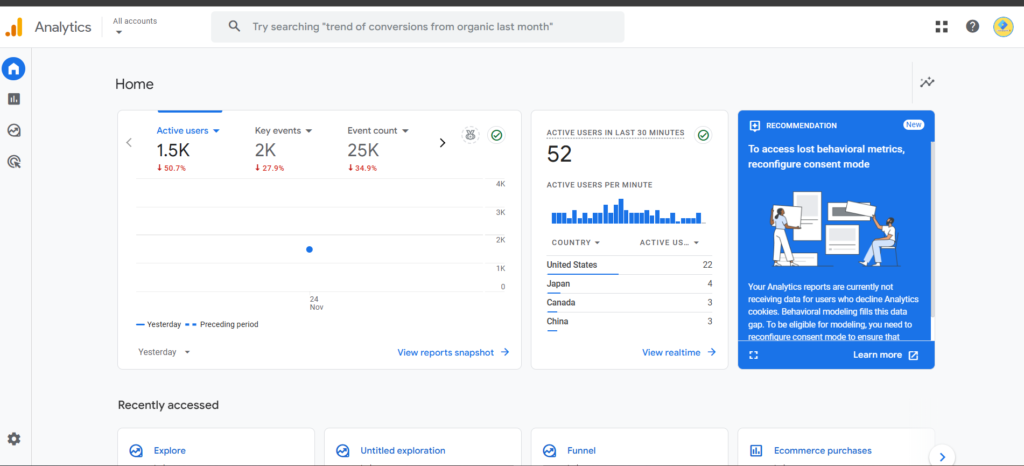
#1.3. DebugView in Google Analytics 4
Please memorize this part of the blog post. I will refer to DebugView multiple times throughout the entire article because it’s essential to ensure that your data was properly sent to Google Analytics 4.
Enable the GTM preview mode to test your changes (you can do that by clicking a big PREVIEW button in the top-right corner of the GTM interface).
Once you enable it, you should see the new Google tag among the tags that fired.
Best Practices for Cookie Banners:
- Clear and Concise Messaging
- Granular Consent Options
- Easy Access to Cookie Settings
- Responsive Design
- Regular Updates and Compliance Monitoring
If the debug_mode parameter contains any value, the event will be seen in DebugView. If you are using a hardcoded gtag.js, here are the instructions for including the debug_mode parameter.
But since we are working with Google Tag Manager, having the GTM Preview mode enabled automatically sets the debug_mode to true. Thus the data will start appearing in the GA4 DebugView.
When you start seeing data in the DebugView, you can click on every event, and then a list of parameters will be displayed.
Click on that parameter to see the value that GA4 received. Now that is some granular debugging
Don't Hesitate To Contact Us
Deploy cookie banners on your webstie with google concent setting. With perfect tracking with Google analytics nad Google ads and Facebook ads
Quick Links
TrackingbyGTM Marketing Agency
Copyright © 2024 All rights reserved.